
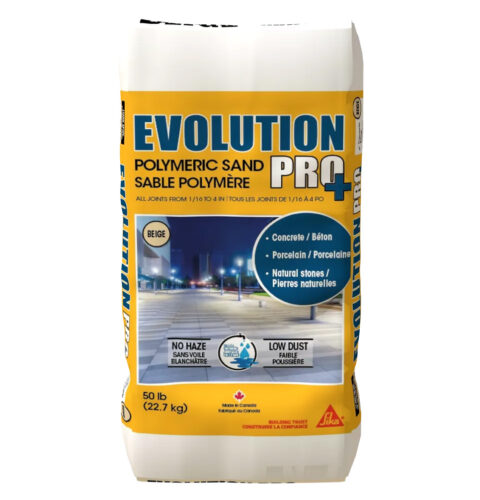
Polymeric sand specifically formulated for commercial and municipal applications. Can be used in a wide variety of installations (interlocking pavers, porcelaine tiles and slabs…)
Evolution Pro Plus 4 polymeric sand is a professional quality product made from specially screened sand and the latest binders high concentration technology. Evolution Pro Plus 4 is a high performance polymeric sand, used in the most demanding projects, for which its unique formulation offers a very fast initial setting, increased resistance to humidity and unrivalled durability.
Evolution Pro Plus 4 is ideal for filling joints between pavers/stones when constructing pavements, driveways, patios or parking lots in commercial settings. Your pavers will be firmly stabilized and will remain flexible to movement, in the most extreme weather conditions.
Features
- No haze
- Low dust
- One step watering installation
Usage
- Ideal for commercial applications and high traffic paths
- Can be used horizontally or on a slope
- Application range in joint thickness from 3 to 100 mm (1/8 to 4 in).
- Concrete pavers, porcelain and natural stones
Packaging
22.7 kg (50 lb) bag
Advantages
- No haze
- Low dust
- One step watering installation
- Increased flexibility to better resist freeze-thaw cycles
- Resistant to ice melters, mineral salts and acid cleaners
- Helps prevent the growth of ant nests and weeds
- Fast gel time to resist unexpected rain after installation
Colour
Available in five (5) natural colours:
- Black
- Gray
- Beige
- Urban White
- Carbon Gray
Compressive Strength
5.4 MPa (783 psi) at 28 days
Shelf Life
12 months in original, unopened bag.
Storage Conditions
Store dry, ensuring that product is not exposed to rain, condensation or high humidity.
Maximum Grain Size
ASTM C144 et CSA 179
Density
1.8 kg/L (106 lb/pi3)
Application Information
Ambient Air Temperature
Minimum 5 °C (40 °F)
Maximum 35 °C (95 °F)
Substrate Temperature
Minimum 5 °C (40 °F)
Maximum 35 °C (95 °F)
Substrate Moisture Content
The application substrate (the pavers or slabs) must be completely dry before application.
Final Set Time
220 minutes
Allow the surface to dry for 24 hours before opening to foot traffic, and 72 hours before opening to vehicular traffic.
Longer drying times may be required when temperatures are below 21 °C (70 °F) for the first 24-72 hours after installation of Evolution Pro Plus 4. Protect joints from rain for a minimum of 24 hours. Ensure that any sprinkler systems that are in close proximity to the newly applied Evolution Pro Plus 4 remain off for a minimum of 72 hours after installation.
Yield
Narrow Joints: 5.6 – 8.4 m² (60 – 90 ft²)
Wide Joints: 1.8 – 3.7 m² (20 – 40 ft²)
Yield will vary depending on the size of the joints and the size of pavers used.
Installation Steps
NOTES ON INSTALLATION
It is important to execute the work in good weather conditions. No rain should be expected within 24 hours following installation. A thunderstorm or heavy rainfall can wash away the polymer sand and displace it on the paved surface. Cover the surface in case of any inclement weather!
Make sure the pavers, slabs or stones are dry before you start spreading the sand to avoid sticking or staining. Furthermore, make sure that pavers are free of polymeric sand before spraying with water.
Have all the necessary and appropriate tools for the installation on hand: Stiff bristled push broom, soft bristle push broom, leaf blower, vibrating plate, spray nozzle with shower setting.
NOTE: The combination of a very steep slope and wide joints can reduce the ability for water penetration into the joints, due to surface water slippage.
In this case, we recommend installing the product in a small test area before proceeding.
Before using sealers or cleaners, it is recommended to wait at least 30 days. Check with the paver manufacturer to determine if it is safe to use these products on your paver surface.
Before attempting touch up’s and or re installations of polymeric sand, the existing sand must be removed to the full depth of the paver and or a minimum of 38.1 mm (1.5 in) before re sanding.
EQUIPMENT
Stiff bristled push broom, soft bristle push broom, leaf blower, vibrating plate, spray nozzle with shower setting.
APPLICATION
STEP 1 – SPREADING: Pour and spread the Evolution Pro Plus 4 polymeric sand on the paved surface. Important: surface must be completely dry.
STEP 2 – JOINT FILLING: Using a push broom, spread the polymeric sand over the joints making sure to fill to the full depth of the paver, stone or slab, leaving a 3 mm (1/8 in) reveal.
NOTE: The manufacturers of some types of pavers recommend the removal of any polymeric sand from the surface of the pavers using a push broom and a leaf blower before proceeding to step 3. Some also recommend to use a vibrating plate machine equipped with a Teflon plate at step 3. Please verify the recommendations of your paver manufacturer before installation.
STEP 3 – COMPACTING: Use a vibrating plate over the entire paver surface for joints less than 6 mm (1/4 in). Repeat steps 1 to 3 if necessary to make sure the joints have been filled to at least 3 mm (1/8 in) below the paver surface.
STEP 4 – SWEEPING & CLEANING: To ensure that no sand sticks to the surface of the pavers, use a stiff bristled broom for the initial sweeping of the Evolution Pro Plus 4 polymeric sand. Then use a soft bristle broom to sweep the excess sand off the surface. Finally, use a leaf blower to ensure the removal of any excess sand residue from the surface. These two cleaning steps are important before proceeding to step 5.
STEP 5 – WATERING / ACTIVATION: Water 5 m² (50 ft²) sections at a time, ensuring your spray nozzle is set to the “shower” position. Always begin the one step watering process from the lowest part of the project. Using the shower head position, generously shower the pavers one time, approximately up to 1 minute per 5 m² (50 ft²) in a left and right motion, while ensuring no displacement of polymeric sand from the joints. It is recommended to check if the water has filtered down to at least 25 mm (1 in) of the depth of the joints. To do this, simply use a screwdriver and lift up the sand, then pack-it back in to it’s original position.
STEP 6 – DRYING/SETTING: Remove any standing water from the surface of the paver with a leaf blower. For optimum performance, a minimum of 24 hours is required to allow the polymer sand to cure and harden properly. Do not walk or drive on the paved surface during this period. The curing and hardening process will take much longer in cold, damp weather. The longer the curing time, in dry and warm conditions, the better and more durable the final result will be (especially for larger joints). Use this product at temperatures over 0 °C (32 °F). In case of unexpected rainfall during the drying period, we recommend temporarily covering the area with a tarp and removing it after rain stops.
CLEAN UP
Clean any tools or equipment after use with water.
Safety Data Sheet
RELATED PRODUCTS
Our Signature Brands

![]()
![]()
![]()
![]()
![]()